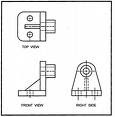
Orthographic projection (or orthogonal projection) is a means of representing a three-dimensional object in two dimensions. It is a form of parallel projection, where the view direction is orthogonal to the projection plane,[1] resulting in every plane of the scene appearing in affine transformation on the viewing surface. It is further divided into multiview orthographic projections and axonometric pictorials.
The term orthographic is also sometimes reserved specifically for depictions of objects where the axis or plane of the object is also parallel with the projection plane,[1] as in multiview orthographic projections.
(http://en.wikipedia.org/wiki/Orthographic_projection)

Isometric projection
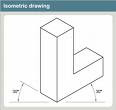
Isometric projection is a form of graphical projection, more specifically, a form of axonometric projection. It is a method of visually representing three-dimensional objects in two dimensions, in which the three coordinate axes appear equally foreshortened and the angles between any two of them are 120 degrees.
Isometric projection is one of the projections used in technical and engineering drawings.
(http://en.wikipedia.org/wiki/Isometric_projection)

Oblique projection
Oblique projection is a simple type of graphical projection used for producing pictorial, two-dimensional images of three-dimensional objects.
(http://en.wikipedia.org/wiki/Oblique_projection)

perfect explanation
ReplyDelete